Anti 3 Star · CWL Ready · Copy Links Included — Built around TH17’s Inferno Artillery and Firespitter mechanics
🟡10 Base Layouts 🟡Anti Ground & Air 🟡War & CWL Ready 🟡TH17 Base Design
Town Hall 17 introduced a major shift in Clash of Clans base design. The Eagle Artillery can be merged with the Town Hall to create the Inferno Artillery, while the Firespitter adds a directional defensive cone and the Minion Prince adds a flying Hero option. These mechanics make compartment depth, directional coverage, Hero defense placement and pathing especially important. Attackers can use high-level combinations such as Electro Titan, Hog-Miner Hybrid and Queen Charge Lalo, but exact armies vary by player and balance state. This guide focuses on strong TH17 layout principles and ten featured layouts for War, CWL and Trophy use.
Town Hall 17 introduced the merger of the Eagle Artillery with the Town Hall, creating the Inferno Artillery, and added the Firespitter plus the Minion Prince. The Minion Prince is not exclusive to TH17; it was introduced with the TH17 update and is available from Town Hall 9 onward. This section focuses on the TH17 mechanics that most directly affect base design, followed by ten selected layouts.
The following 10 layouts are live on CocWarBase and cover War, CWL and Trophy use cases at TH17. Each layout is presented as a practical design example; exact results depend on the attack, troop levels, Hero Equipment and current balance state.
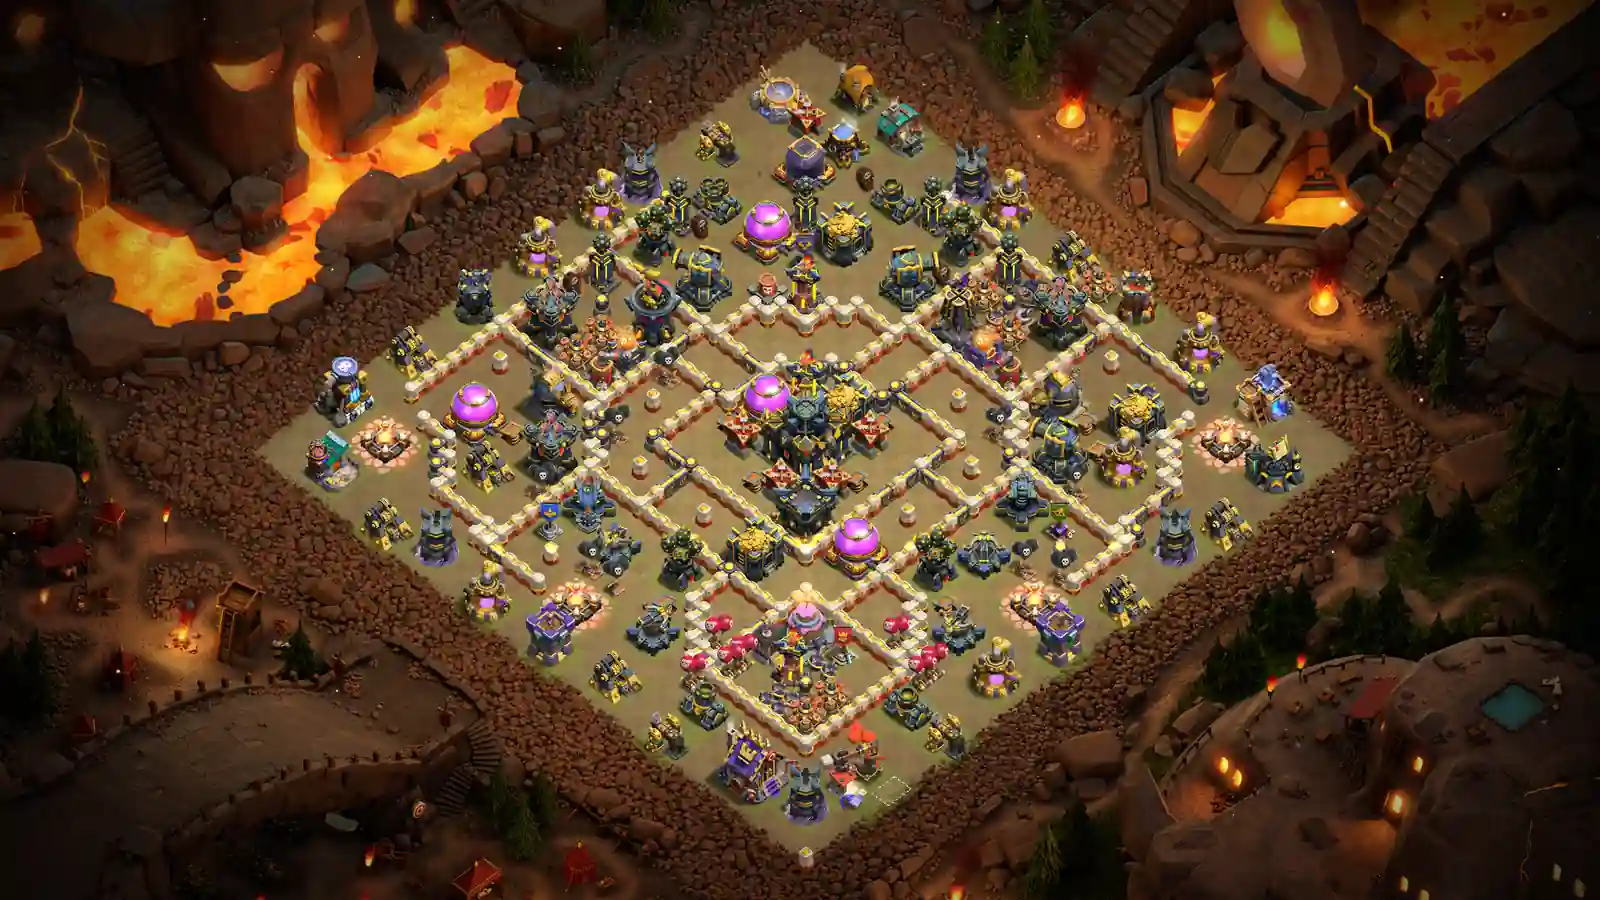
This TH17 war base builds its defense from several rotated, nested square wall rings that spiral outward from a tightly packed core, creating a pinwheel effect that gives ground troops no clean, repeatable path to the center. The Town Hall sits just off-center in the innermost ring, flanked diagonally by high-value defenses on both sides, while roughly 12 to 14 distinct compartments force long, winding routes rather than a direct funnel. Storage buildings are deliberately spread across the outer two rings instead of clustered, trading easy farming access for war resilience, and trap markers cluster near the natural chokepoints along the top and right edges where the ring walls narrow. Three separate compartments each hold splash-damage coverage, spreading area denial across multiple pathing routes instead of stacking it centrally. The anti-ground tagging reflects how the pinwheel’s winding paths are specifically built to punish Hog Rider and Electro Titan-led ground pushes that rely on predictable tunnel routes — attackers have to commit troops well before they can see whether the core is even reachable from their entry point.
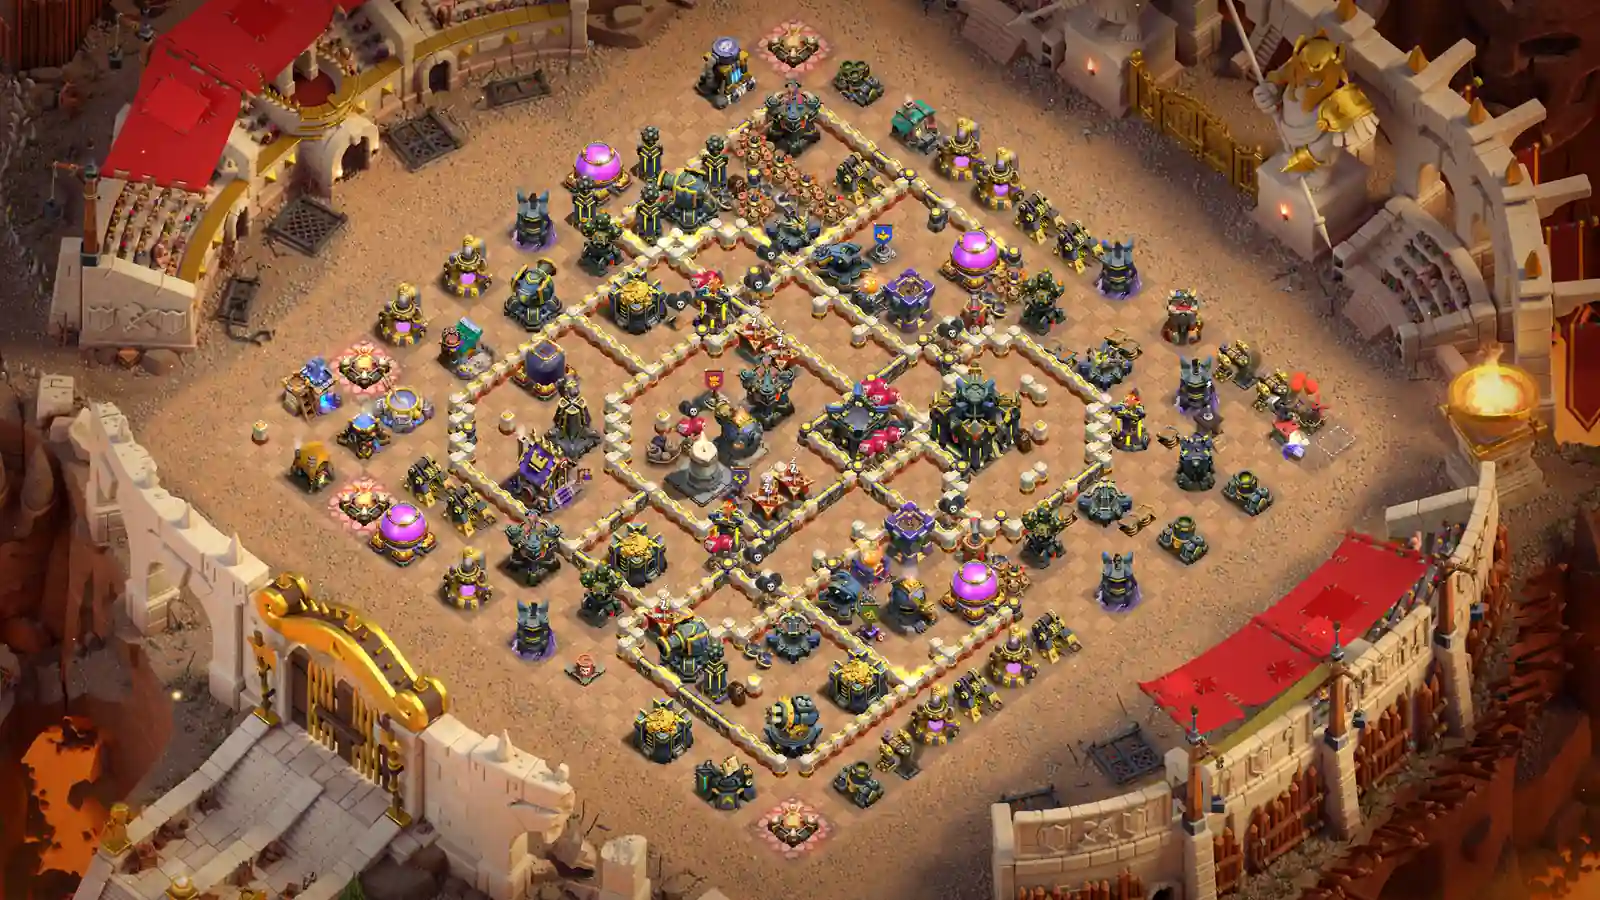
Built from two overlapping diamond-oriented squares, this TH17 base forms a dense lattice of small compartments with the Town Hall placed dead-center to maximize diagonal wall coverage from every angle. A protected defensive structure sits isolated in its own pocket near the core rather than sharing a compartment with lesser buildings, while storage buildings are grouped symmetrically along the left and right flanks — a choice that favors trophy defense over easy farming access. Trap markers sit near the outer lattice points where compartments narrow into single-tile chokepoints, specifically punishing troops that hug walls while pathing. With 14-plus total compartments, the lattice keeps any single funnel from carrying troops far before a fresh wall break is required. The anti-2-star and anti-ground tags fit this base well against Hog-Miner Hybrid pushes, where the tight, uniform compartment count denies the long uninterrupted tunnels that hybrid ground pushes depend on to reach the core before running out of housing space.
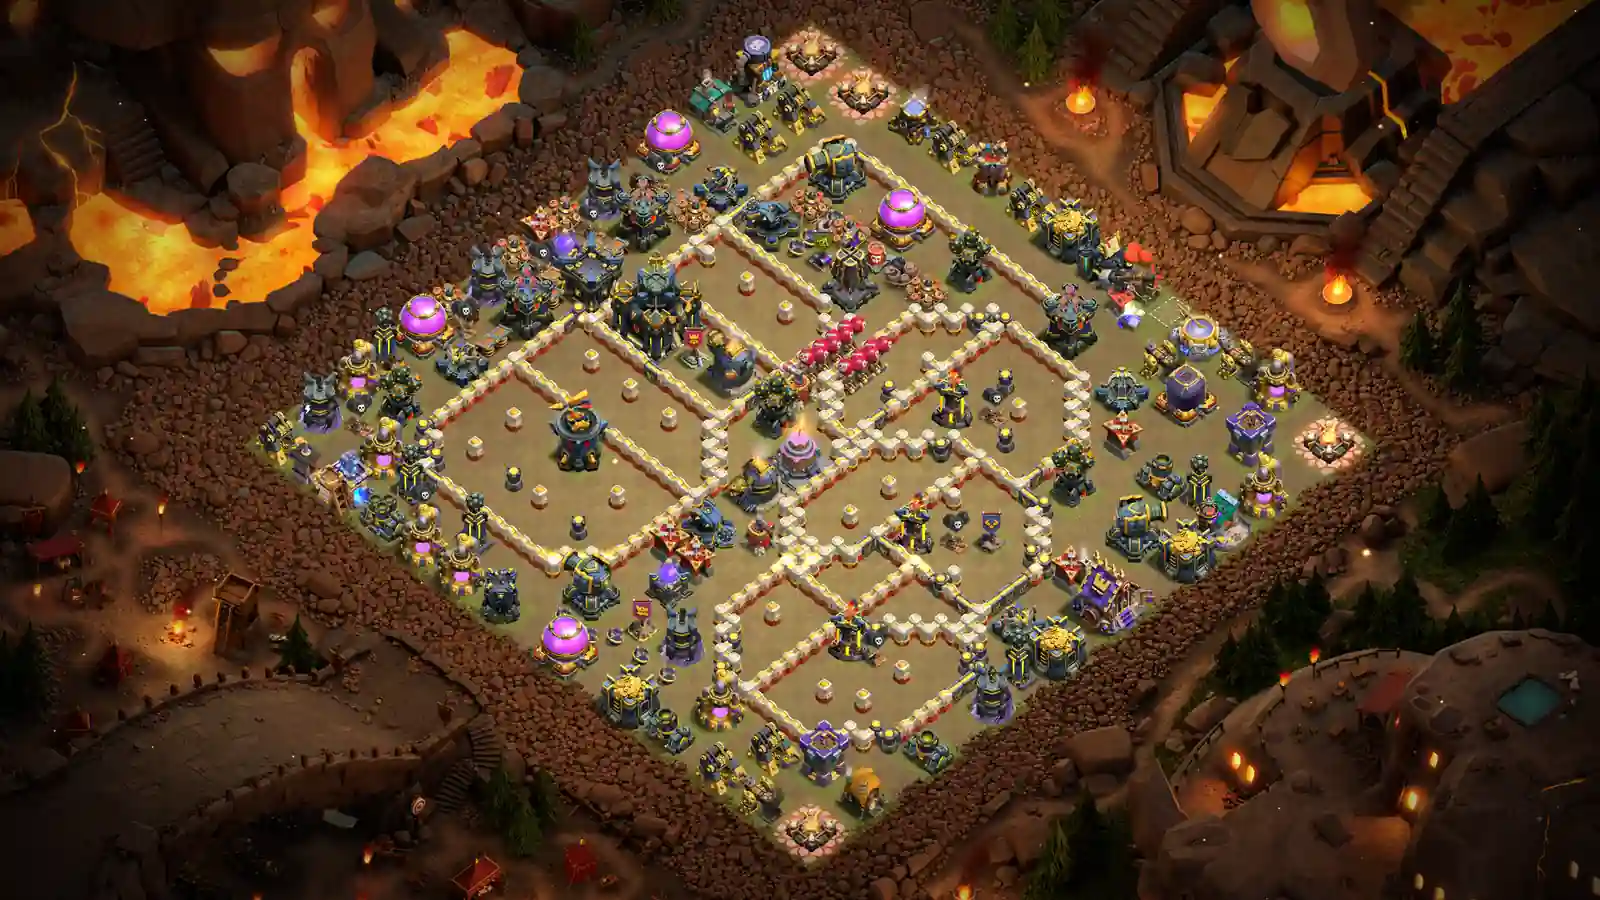
This TH17 war base is built around a double-diamond defensive structure — a compact, heavily protected core wrapped in a second layer of diamond-shaped compartments rather than a single ring. The layered design creates a genuinely complex pathing network, forcing attacking troops through separate sections instead of offering one direct route to the center. Key defenses are distributed across both the inner and outer compartments for balanced coverage rather than front-loading power at the core, while storages and support buildings add further protective layers around the true target. The symmetrical structure spreads coverage evenly across all sides and creates multiple entry points, each with a different pathing challenge, and additional outer buildings add spacing that disrupts the predictable attack routes many scouted CWL opponents plan around in advance. Carrying the full anti-3-star, anti-2-star, anti-air, and anti-ground tag set with no weak side, this is one of the most balanced layouts in the collection, with design features intended to complicate both air-led and ground-led approaches.
This TH17 trophy base uses a symmetrical diamond-core layout with layered compartments wrapped tightly around a well-protected center. Key defenses are distributed across the inner sections to create balanced coverage from every direction rather than concentrating strength on one side, and the diamond-shaped walls split the base into several separate compartments that force troops to navigate multiple layers before reaching anything of value. Storage and support buildings sit inside the defensive structure itself rather than on an exposed edge, while outer defenses add funneling control that steers early deployments away from the true core. Built primarily for trophy pushing with war as a secondary use, the symmetry keeps the base quick to read on the matchmaking screen while still giving attackers a genuine multi-compartment fight — the anti-ground tag suits it well against Hog Rider and Electro Titan pushes that rely on a fast, direct route to the Town Hall.
This TH17 war base spreads a broad, elongated diamond wall structure across a wider footprint than most layouts in this set, with a heavily compartmentalized center holding the Town Hall and major defenses across both the central and upper sections. The surrounding diamond zones separate defenses, storages, and support buildings into distinct pockets rather than one dense hub, and narrow entry paths around the inner walls slow troop movement while wider side compartments add extra defensive depth on the flanks. Buildings and defenses are deliberately spaced around the full perimeter to extend the total attack path, denying a simple direct push straight through the middle. The elongated shape also works against Lalo-style air pushes, since the extra width forces Lava Hound and Balloon groups to cover more distance under Air Defense fire before reaching a compartment worth breaking into — a solid all-rounder for war, CWL, and casual trophy defense alike.
This TH17 hybrid base uses a dense cross-lattice wall layout with multiple interconnected compartments wrapped around a protected central core. The Town Hall and major defenses run through the central sections, while key defenses and storage buildings are deliberately distributed across separate compartments rather than left exposed in one large open area. The lattice walls create several offset entry points and narrow pathways that make a direct route to the core genuinely difficult to find, and storages spread through both the interior and the corners add extra protective layers between the outer perimeter and anything worth defending. Additional defenses around the outer sections extend total troop pathing and provide coverage from multiple attack angles rather than a single predictable direction. Built as a hybrid layout, the dense compartmentalization holds up for war defense while the corner-distributed storage protection also makes it a genuinely usable base between war days — a practical middle-ground pick for TH17 players who don’t want to maintain two separate layouts.
This TH17 war base builds a dense cross-lattice structure inside a rotated diamond footprint, with interlocking compartments forming a cross-shaped skeleton that radiates outward from the center. Diagonal walls throughout create a tight, maze-like layout that forces long, unpredictable pathing instead of a clean funnel to the core. The Town Hall sits dead-center, heavily boxed in by multiple compartment layers, with Dark Elixir storages tucked near the middle rings so attackers have to choose between chasing loot and pushing for the Town Hall. Splash-damage and high-DPS defenses are distributed across all four arms of the cross rather than stacked in one spot, meaning defensive coverage overlaps into the middle no matter which side gets attacked first. Small buffer compartments packed with Army Camps and Spell Factories soak up early troop deployments and trigger traps before attackers reach anything valuable, while a wide, mostly empty perimeter apron denies easy edge-drop damage and forces a genuine pathing commitment. Carrying every major anti tag — 3-star, 2-star, air, and ground — this is one of the strongest all-around layouts in the set, holding up equally well against Yeti-Bowler attacks and Electro Titan ground pushes.
This TH17 war base follows a central-stack radial design, consolidating nearly all critical defenses into a single core compartment rather than spreading them across the base. The diamond-rotated grid extends compartment walls outward from the core in a spoke-like radial pattern, deliberately generating long, elongated diagonal pathing lanes instead of short, direct cardinal approaches — a pathing mechanism built to maximize how long attacking troops sit in range of splash and single-target defenses before reaching the center. The core cell holds a high-density cluster of top-tier defenses behind maximum wall layering, consistent with protecting the Town Hall weapon and other high-value defenses as tightly as the base allows. Rather than clustering splash coverage in one ring, several large domed structures sit at staggered radii from the core, maintaining area-damage coverage across sequential attack phases instead of front-loading it entirely at the perimeter. Heroes are stationed off-core near the upper boundary alongside supporting defenses, protecting them from an early snipe while still covering the approach. The anti-ground tag reflects how the extended spoke pathing specifically punishes Hog-Miner Hybrid and grounded Electro Titan pushes that rely on short, direct routes to the core.
This TH17 war base takes a layered-ring approach within a diamond grid, distributing defenses across concentric wall rings moving outward from the core rather than consolidating everything into one dense hub. The layout is built from nested inner, mid, and outer diamond rings connected by short wall segments rather than long diagonal spokes, producing evenly distributed compartments around the full perimeter and forcing troops to breach successive rings in sequence instead of following one long funnel path. The innermost ring holds a small, tightly walled cluster near the top-center — smaller and more isolated than a typical central-stack core, reflecting a design that leans on ring-based delay rather than raw central mass. Several large domed splash defenses sit at the rough cardinal and diagonal edges of the mid-to-outer rings, giving broad coverage across multiple entry points instead of concentrating power centrally, while hero-adjacent structures scattered near the upper-middle ring keep heroes close enough to mid-tier defenses for mutual protection. The outermost ring adds standalone point defenses plus trap structures at the four diamond points for edge resistance. Carrying the full anti-3-star, anti-everything, anti-air, and anti-ground tag set, this ring-based delay structure is built to grind down Queen Charge Lalo and Yeti-Bowler attacks pushes ring by ring rather than betting everything on one hardened core.
This TH17 war base uses a single walled structure rotated 45 degrees into a diamond orientation, built from multiple nested diamond wall rings connected by cross-walls to create a genuinely layered compartment system. Unlike a purely symmetric design, the compartments vary in size — sections on the left and lower side run larger or differently shaped than the right and upper side, giving the base a deliberately irregular, harder-to-read structure despite its ring-based foundation. The innermost walled compartment sits roughly in the middle but shifts slightly toward the bottom-center, likely housing the Town Hall alongside the base’s highest-priority defenses. Four large domed structures are placed at different points around the mid-to-outer compartments rather than clustered together, spreading splash coverage broadly instead of concentrating it in one ring, while trap-style structures sit at the four outer diamond points to catch predictable approach paths. Carrying anti-3-star, anti-everything, and anti-ground tags, the offset, non-uniform compartment sizing is specifically effective against attackers who scout a base expecting clean symmetry — Hog-Miner Hybrid and grounded Electro Titan pushes can face more varied pathing when compartment sizes do not form a predictable pattern.
TH17’s defensive identity includes the merged Inferno Artillery, the aimed Firespitter and the Multi-Gear Tower, alongside the broader defensive roster available at this Town Hall. The sections below focus on the mechanics that matter most for base layout decisions:
Since the Inferno Artillery can’t be moved or upgraded in position, build your entire base around delaying its exposure. Use multiple irregular wall layers and compartments to delay access to the Town Hall with a Firespitter or Scattershot covering the most likely breach point. Because the Inferno Artillery has no trigger delay and the Town Hall has no death bomb, delaying Town Hall exposure can keep attackers under defensive pressure for longer.
Position your Firespitter’s cone to overlap with the Multi-Gear Tower’s range rather than covering a completely separate zone. The Multi-Gear Tower’s Long Range and Fast Attack modes already hit both ground and air — stacking Firespitter coverage on top creates a genuine kill zone instead of two defenses each covering half the problem.
Building your own TH17 war base means designing around the Town Hall’s merged Inferno Artillery rather than a separate Eagle Artillery. These seven tips give you a practical foundation:
➤ Bury the Town Hall behind multiple wall layers. With the Eagle Artillery merged into the Town Hall, every layer directly protects your only Town Hall weapon.
➤ Point the Firespitter at your widest combined-arms lane. Its cone hits both ground and air, so aim it where Lalo pushes and ground smashes are most likely to overlap.
➤ Assign the Minion Prince near the innermost compartment. The defensive Minion Prince is most useful when its Hero Banner protects an important approach or core area; avoid placing the Hero purely for a claimed freeze effect that is not part of the base Hero description.
➤ Spread Scattershots and Inferno Towers across separate rings. Avoid over-concentrating major splash defenses so one spell sequence cannot remove too much defensive coverage at once.
➤ Use irregular compartment sizes, not uniform grids. Predictable, evenly sized compartments are exactly what scouted CWL opponents plan their funnels around.
➤ Overlap the Multi-Gear Tower with your Firespitter. Two defenses covering the same lane create an actual kill zone instead of two half-measures.
➤ Rotate your base every 2 to 3 wars. Competitive attackers can identify repeated pathing and trap patterns through scouting and replays, so periodic layout changes can add variety.
Four important attack styles to consider when designing a TH17 base are: Your war base needs to address all of them. Here is how each works and the exact design counter:
Electro Titans are durable ground Troops that can deal area damage through their attacks and chain effects, so compartment spacing matters. Counter with irregular, non-uniform compartments that slow the Titans’ push and a Firespitter positioned to chip damage before they reach the core.
Hog Riders jump walls entirely while Miners dig underneath them, splitting your defenses’ attention between two very different threats. Counter with Giant Bombs and Firespitter coverage on likely landing zones, plus deep compartments that punish Miners the moment they surface.
The Archer Queen clears ground defenses ahead of a Lava Hound and Balloon air force. Counter with spread Air Defenses and a Firespitter angled toward the widest air corridor so no single Lava Hound pop clears your entire air coverage.
Yetis tank while Bowlers lob damage over walls from a safe distance, avoiding many close-range defenses entirely. Counter this type of push with compartment depth, layered splash coverage and a defensive Hero Banner position that protects the approach you expect.
The best TH17 war base in 2026 buries the Town Hall behind at least four irregular wall layers, points the Firespitter toward the widest combined ground-and-air approach, garrisons the Minion Prince near the innermost compartment, and spreads splash defenses like Scattershots and Inferno Towers across separate rings instead of clustering them.
Aim the Firespitter at your base’s widest combined-arms approach — the lane most likely to see both ground and air troops. Unlike the Air Sweeper, its cone damages both troop types at once, so covering an overlapping threat lane gets more value than covering a purely ground or purely air corridor.
The Inferno Artillery is formed by merging the Eagle Artillery into the Town Hall. It fires 4 projectiles at once, stays continuously active with no trigger delay, and leaves no death bomb when destroyed. Since it can’t be repositioned, your only strategy is delaying Town Hall exposure with deep, multi-layer compartments.
Tap the Copy Base Link button next to any layout on this page. Open Clash of Clans, go to your home village, tap Edit Layout, then tap Import Layout and paste the copied link. The full base — walls, buildings, and traps — loads automatically into an empty layout slot, ready to review and save.
Strong Clan Castle picks for TH17 war defense in 2026 include a Yeti or Electro Titan for close-range tanking against ground pushes, and a Headhunter or Super Witch for anti-hero and anti-swarm coverage. Ask clanmates with maxed TH17 troops to fill your CC before every war.